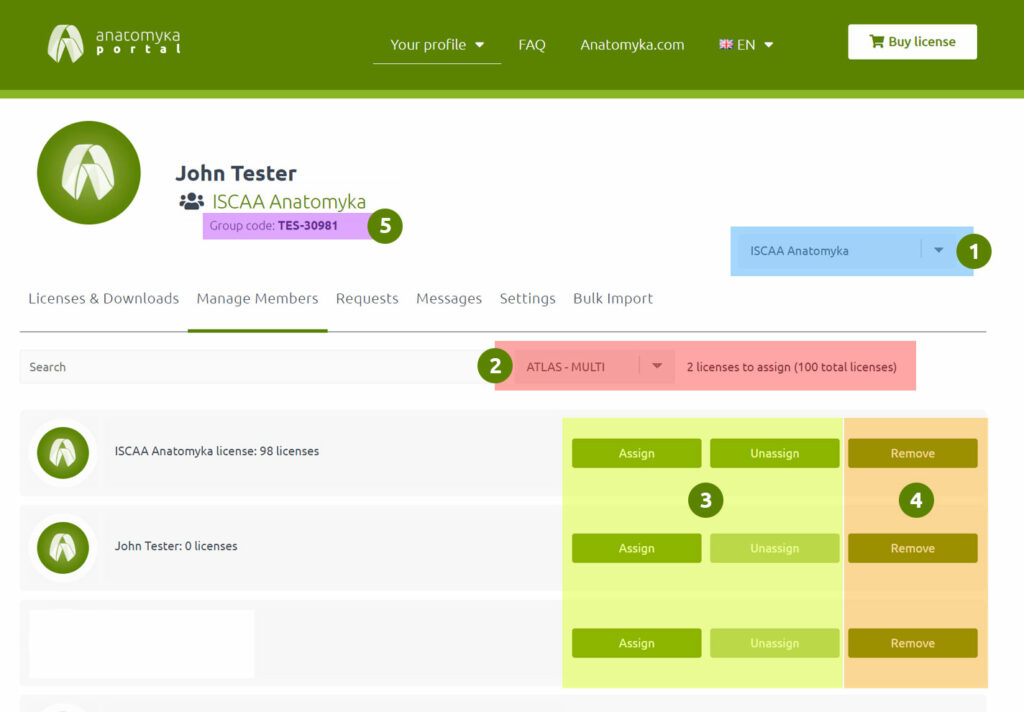
Group licence management
If you are applying for membership, you need to know the unique group code (5 - Figure 1). Ask the group administrator for this code.
1. License assignment and CANCELLATION
1. Log in to your account (you must be an administrator of the group, if you are not, contact support@anatomyka.com)
2. Go to Your Profile > Licenses & Downloads
3. Select your team if needed (1)
4. Go to the Manage Members tab
5. Select a license type (2)
Academic EDU – Education License – Windows, MAcOS
Academic – Education license – Windows, MAcOS
Atlas multi – personal license – iOS, Android
6. Assign/remove a license to a member (3) – don’t see the member in the list? See the instructions on how to add a member to the group below or refresh the page if necessary
2. Adding a new members to the group
1. Log in to your account (you must be an administrator of the group, if you are not, contact support@anatomyka.com)
2. Go to Your Profile > Requests
3. Approve or reject requests
4. Refresh the page and a new member will appear in the Manage members section
5. Assign the license according to the instructions above
* With a large number of members, bulk uploading from an excel sheet is also possible.
3. REMOVE MEMBER from YOUR GROUP (figure 1)
1. Log in to your account (you must be an administrator of the group, if you are not, contact support@anatomyka.com)
2. Go to Your Profile > Licenses & Downloads
3. Select your group if needed (1)
4. Go to the Manage Members tab
5. Select the license type (2) and unassign all licenses (3) from the member you want to remove
6. Delete the member (4)
4. How to ask for group membership
1. Log in to your account or create one
2. Go to My Profile > Join the group
3. Enter the group code and submit it
(Ask for the group code from the group administrator/teacher.)
4. After submitting your request, an administrator must confirm your membership and assign you a license
5. If your membership is confirmed, in My Profile > Licenses and Downloads, select your group (1) to see your assigned licenses.
6. Download and install the app
* See more in the download and install section


